Discover the artistic brilliance of Ganesh Chaturthi 2023 with our immersive AutoCAD journey into Angel Wing embellishments. Explore divine designs and intricate detailing in this unique celebration. Join us for a transformative experience
Introduction:
Ganesh Chaturthi, celebrated with unparalleled fervor, stands as a prominent cultural festival, both in India and globally. One pivotal facet of this jubilant celebration involves the artful ornamentation of the Ganesh idol and its surroundings, elevating the festivity’s inherent charm. In this definitive, step-by-step guide, we shall embark on a meticulous journey through the realm of AutoCAD, unraveling the intricate process of crafting and customizing angel wing adornments for this auspicious occasion.
Step 1: Procure the Angel Wing Template
Commence your expedition by securing an appropriate angel wing template image, readily accessible through online resources. Employ widely-recognized search engines, such as Google, to scout for angel wing templates. Handpick an image that resonates with your artistic vision and retain it in your electronic repository.
Step 2: Convert to DWG Format
For seamless integration into AutoCAD’s domain, it is imperative to transmute your selected image into the exclusive DWG format, the preferred medium of this potent software. A multitude of reliable online converters are at your disposal. Exercise discernment in your selection and meticulously follow the conversion guidelines to ensure an immaculate transition.
Step 3: Precision in Space Measurement
Mastery over available space holds paramount importance. Accurate measurement of the designated area for the placement of angel wings serves as the cornerstone upon which your design shall flourish, guaranteeing a flawless fit and aesthetic enhancement.
Step 4: Table Dimensions for Ganesh Idol
Delve into meticulous measurement by meticulously recording the precise dimensions of the table or platform earmarked for your revered Ganesh idol. These measurements are of utmost significance, as they shall dictate the seamless embrace of your angel wings around the idol.
Step 5: Ganesh Statue Dimensions
Leave no room for approximation. Diligently ascertain the height and width of the Ganesh idol itself. These dimensions shall prove pivotal in crafting angel wings that elegantly frame the idol.
Step 6: Architectural Planning in AutoCAD
Harness the formidable capabilities of AutoCAD to give birth to your masterpiece. Initiate a fresh drawing and import the DWG image of your chosen angel wing template. Precision should serve as your guiding star throughout this process.
Step 7: Pristine Resizing of the Template
Exercise meticulous precision in resizing the angel wing template, utilizing AutoCAD’s scaling tools. The ultimate objective is to ensure that the wings coexist harmoniously within your designated space, paying homage to the dimensions you have meticulously measured.
Step 8: Dissecting the 4 Layers of Wings
If your angel wing template features multiple layers, entrust AutoCAD to be your surgical instrument. Skillfully dissect and segregate these layers, enabling you to focus on each layer individually, thereby perfecting their form.
Step 9: Methodical Layer Labeling
Maintain impeccable organization by diligently labeling and annotating each layer within AutoCAD, mirroring the reference diagram. This foresight guarantees clarity during your creative journey.
Step 10: Sculpt and Refine Your AutoCAD Design
Now, unleash your creative prowess. Leverage AutoCAD’s array of drawing and editing tools to sculpt and refine the angel wings. Contemplate the inclusion of intricate patterns, vibrant hues, and any other elements that align with your artistic vision.
Step 11: Imprinting A4 Page Dimensions
Within AutoCAD, imprint the A4 page dimensions as a reference point. This ensures your design adheres to the printable area’s confines, simplifying the reproduction process.
Step 12: The Culmination – Printing the Template
In the final stretch, breathe life into your digital masterpiece by directly printing the angel wing template from AutoCAD via your selected printer. Validate that your settings optimize the highest print quality, while also confirming the chosen paper size.
Step 13: Meticulous Assembly of Sub-Wing Templates
As your vision takes tangible form, meticulously assemble and affix the sub-wing templates, uniting them to forge four major wing layer templates. The precision of your assembly safeguards structural integrity.
Step 14: Transferring Templates onto Sturdy Card Sheets
Enhance the durability of your angel wing decorations by transferring each of the four major wing layer templates onto robust card sheets. Precision once again emerges as your steadfast ally, ensuring impeccable tracings onto the card sheets.
Step 15: Clarity in Left and Right Templates
Maintain unwavering commitment to clarity by distinguishing between the left and right sides of each major wing layer template. Prominently label them as “Left” and “Right” to eliminate ambiguity during the assembly and placement phases.
Step 16: The Grand Presentation – Mounting the Master Templates
With the left and right major wing layer templates prepared, affix them to the designated wall with meticulous precision. Symmetrical placement ensures a balanced and visually captivating outcome.
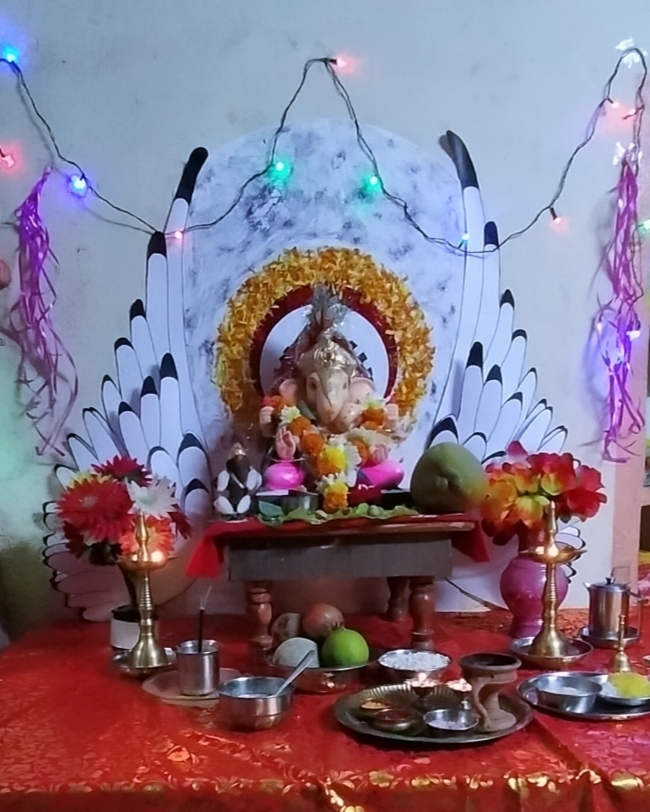
Step 17: The Apex of Creativity – Enhancements Abound
This phase marks the zenith of your artistic journey. Explore the addition of supplementary embellishments, such as captivating LED lighting effects strategically positioned along the wings’ perimeters. Adorn the wings with an array of artificial blooms, intricate beadwork, or complementary adornments to synergize with the overarching theme and aesthetics of your Ganesh Chaturthi setup.
Conclusion:
Through these eighteen exhaustive steps, you have embarked on an artistic odyssey, weaving magnificent angel wing embellishments for Ganesh Chaturthi, leveraging the prowess of AutoCAD. Your distinctive, personalized touch is poised to infuse a transcendent allure into your festive decor, etching this occasion into eternity. Embrace AutoCAD’s precision, channel your artistic flair, and let your Ganesh Chaturthi celebration radiate with divine elegance.
Ganpati Bappa Morya !!!